Tuesday, January 8, 2013

Treadmill Workouts

OK...I'm guilty of making the good 'ole "I'm going to lose weight this year..." resolution too. But if I know one thing, it's that if your workout isn't somewhat enjoyable or rewarding you most likely won't stick with it. I recently joined a local gym in an effort to add weight lifting into my workout. I love lifting weights and running, but running on the treadmill, at the gym, is about as much fun as going to the dentist. I get soo bored and uninterested by the time 30 minutes is up. When I'm on the road, I get lost in my thoughts or what is going on around me...but for some reason, the treadmill just isn't the same. To combat this frustration, I found some treadmill workouts that are "butt-kickers" and keep your mind off the monotonous workout itself.

Option 1:

6 minutes easy-18 minutes interval-6 minutes easy =30 minutes
During the interval: 2 minutes at a steady pace-2 minutes at a 85-90% RPE

Option 2:

This option incorporates more incline work with more walking intervals. 


Option 3: 

I really like this option because it has you running at more steady pace for a longer distance. 
Itsfitnessbaby.com

These are just a few of the MANY options out there. You'd be AMAZED at how many awesome workouts there are online!!! Find something that works best for you and DO IT!!!! In the meantime, keep some of your runs on the road...it confuses your body a little bit and keeps your muscles acclimated to the "extra" work they have to do...plus, everyone can use a little fresh air!!! 
Do you have a treadmill workout I need to try? Feel free to share!!! 
                  ~ G 

PS. Consider following my blog, by clicking the "Follow Me" button the right hand side! 

Thursday, January 3, 2013

Organize your Life


With the New Year in full swing, it’s  a perfect time to evaluate your organization. Whether it be organizing your home, desk or your schedule, keeping order can make your life ALOT less stressful.
Here are 10 tips to help you organize your life. You don’t have to implement all of them but just a few can make a BIG difference.
1.       Buy a planner.  This is the best "first step" you can take to organize your life. Keeping track of important dates, times and events is crucial. If you have a place where you have all that information, it allows your mind to rest! You can find great planners anywhere from Target to a local invitation store. Some planners have just monthly calendars and others have daily agendas. I suggest buying a planner that has both monthly calendars and daily agendas. I think of it as the "big picture" and the "detailed picture". 

Ballard Design
2.       Baskets are your best friend.  I really love baskets! Baskets allow you to keep stuff off the ground, but have it in a convenient location. For example, put a basket of blankets in the living room. The basket is appeasing to the eye, yet blankets for chilly nights are handy. Also, baskets are great for collection random items throughout the house. I personally love the baskets that fit on the staircase. I can foresee throwing kids toys/books in those and assignment a basket for each child. 


3.    Declutter aka THROW OUT! Set aside 2 times a year to clean out closets, drawers, anything that "collects stuff". Throw out or donate anything that you haven't used in that 6 months. 

4.       Make everything visible. This is especially important for closets. When you open up a linen closet (for example), you should be able to see all the items in the closet, without rummaging through the stuff. In an effort to help, drawers or baskets may be helpful. 

5.       Make lists. I am a professional list maker. If I don't write it down, the chances of me remember are minimal. Posts are perfect for this. Have a pack of "Post Its" in each room and in your car/purse. If you think of something, write it down on a "To do" list. Writing it will help you remember, as well as provide a visual reminder. 

6.       Set a schedule. People that have set schedules tend to forget less and have better productivity. Try to make a schedule for each day or week and stick to that schedule as best as possible. Consistency is KEY. 

7.       Pick and Choose. There's an old saying that it is better to do one thing well than to do many things subpar. Pick the most important tasks to complete. If some things have to wait that is OK! You will be productive if you choose a few items rather than halfway complete several. 

8.       Do one thing at a time. Pick 1 task to complete and don't begin another task until you've finished the first. 

9.       Color Code. Whether it be your towels or clothes, having items in color code will help with the overall organization.

10.    Make your bed! I sound like my mother!!!!! BUT...the older I get the more I enjoy having a "made bed". Your home will feel more organized if you come home to a bed that is put together. Also, it creates a more relaxed feeling in the room and less stressful. This is a great habit to teach your kids. Give them some responsibility with it. 

      I hope these tips help make your life/home/routine a little more organized. I am definitely going to try and implement a few of these! Remember, it's what works for you and your house! If something isn't working, change it! Let's make an effort to get organized in 2013!!! 
                                                                                                                        ~ G 

Disclaimers: I am by no means an expert organizer, just a normal Type A personality that likes "things" in its place. Also, I do not have children...but I hope that I can implement some of these tips when I do have kiddos in the house. 

Wednesday, January 2, 2013

Guest room inspiration


Since we moved into our house, I have tried to be very patient with decorating. I have a very specific taste and I didn't want to just fill the house with random chotchkies. For this reason, my house is not decorated completely, quite yet. My mom once told me, decorate your house room by room. If you don't you will end up with incomplete thoughts in each room. I can understand why she said this. It's very easy to get on a "kick" and if you don't stay focused, that "kick" will travel. 


Until last week, our 2nd guest room was completely empty...well, except for our ironing board and bike trainer, ha! The bed is a beautiful antique bed and sits in the room quite nicely. Now that I have this large piece of the puzzle, I want to start gathering some inspiration to complete the room. I have guests coming in February and would love the room to be completed for them!


PhoebeHoward.net


http://acountryfarmhouse.blogspot.com/

I love the contrast of dark wood with naturals and white...basically most of my house is this idea. I think white bedding in a guest room creates an inviting, peaceful feel. It resembles an old Bed & Breakfast to me.
horchow.com

I also love the use of natural linen for bedding. It's light and creates a comfy, less formal look. 

Keep the room "clean" is important for a guest room. You don't want to clutter the room or the bed with unnecessary items. 
Pinterest.com
I <3 Buffalo check!!! I think my eyes are always drawn towards it...balance of french country, traditional yet functional. This resembles my master a little too much though... ;( 


I am NOT very patient, but I'm trying to gather all my inspiration so that I make the perfect choice for the room. It's is always worth the wait!!!!

Stay tuned for Guest Room feature COMING SOON! 

                             ~ G 


Tuesday, January 1, 2013

Happy New Year


2012...What an EXCITING year! This year has been one of the best years I can remember...so many exciting things happened this year. I ran my first marathon. Brian and I celebrated our 1 year anniversary!!! We became landlords & bought a new home. We celebrated friends getting married and friends having babies.  We met great new friends and enjoyed the company of old friends!! It's always fun to reminisce on the past year and remember all the POSITIVE things that happened!
Celebrating our 1st anniversary

Celebrating one my dearest friend's wedding (Cameron Petrie Hockaday)

Finishing my first marathon (26.2 with Donna) 
I can't wait to see what this year brings! I've already got so many goals set and I know this year will be even better than the last!!!! Here are some of my "goals"/resolutions:

1- Be more positive: I want to find all the positive aspects of life, rather than focusing on the negative or "what ifs".

2- Capture more moments by taking more pictures!!! Santa brought me a very nice camera, so I want to try learn more about photography.

3- Finish my master's degree...I am hoping I can finish all my classes by the end of 2013!

4- Loss some weight ( I won't get specific) but I want to reach a certain weight AND decrease my running speed by about 1 minute/mile

5-BLOG MORE!  I'd like to blog at least 2 times a week!


What are some of your resolutions or goals...remember, resolutions don't have to start on January 1st, they can start at any point! Just START! 

Happy New Year to all of you and I look forward to sharing what 2013 brings!!!!

                                                                                          ~ G

Sunday, December 30, 2012

New Years Eve

Casual New Year's Eve

Although most think of New Years as a time to pull out all the stops on glitz and glitter, it's possible to bring in the new year style without going "over board". Consider black jeggings with a colorful blouse and fur vest. If you are looking for a more casual look, try a riding book or wedge, for a dressier feel, slide on a black pump. Dress your outfit up with your style of jewels. Statement pieces are a personal favorite of mine! 
           ~ G 

Thursday, December 27, 2012

bluffton

I <3 Bluffton!!!! Last weekend, Brian and I went up to Bluffton, South Carolina for the weekend. Brian has family that live there and ANY chance we get to visit, we enjoy the trip. His aunt and uncle hosted a wonderful Christmas party on Friday night with all their friends of Hilton Head...it was great see and meet so many wonderful people. 


Their property is absolutely fantastic...It sits right on the bluff, with beautiful salt water marsh! The tides are incredibly drastic there and this particular morning was low tide. I could sit out in the backyard all day long overlooking the beautiful natural scenery. This day it was FREEZING!!!!!! Brian and I bundled up to walk down the dock and we were able to snap a quick pic....selfie :)
up close and personal :) 
One of my very favorite parts of his aunt and uncles house is the "game" room....and by "game" I mean WILD game! B's uncle is a huge hunter and this room is a montage to his hobby. This is only half the room...wish I had my new camera to shoot some of the awesome features of this room....TRULY INCREDIBLE! That antler chandelier...I mean ReAlLy?!? 


I love a good front porch swing, so I forced Brian to take a picture out there. It was a such a beautiful day... nothing beats a relaxing morning on a front porch swing :) 

Bluffton is only about 20 minutes from Savannah, so on our way home we stopped by to do a little eating and shopping (the two do go together, right???) We were able to stop by some of very favorite shops while in Savannah. I've never been to Savannah during Christmas time. It's so awesome to see all the stores decorated so perfectly. I love The Paris Market & One Fish Two Fish...I also found this awesome antique store called the Corner Door. I could have spent all day picking up little treasures...I'll be going back, once all the Christmas decor comes down. 

The last time we were in Savannah, a local recommended the Crystal Beer Parlor for lunch...so we decided to stop by there again. They are known for their local brew and awesome burgers! My fa-in-law got this "Cheeseburger Club"...a little raw for my taste, but HEY, it still looks good :) My burger was HUGE...with grilled onions & grilled mushrooms...mmm...so good!  


Any weekend trip is a nice get away. I love getting to spend quality time with my husband and family and friends. I really do love Bluffton and Savannah and can't wait to go back and visit soon! 


Feel free to comment at the bottom....or consider "following" me by clicking the button the right hand side of the page! 


                                                                                             ~ G


Sunday, December 23, 2012

dining room table


One of my very favorite hobbies is finding old pieces of furniture and updating them to fit my home. Most of the furniture we have is refurbished in some way. I have a few local antique stores that I search on a weekly basis for new finds. 

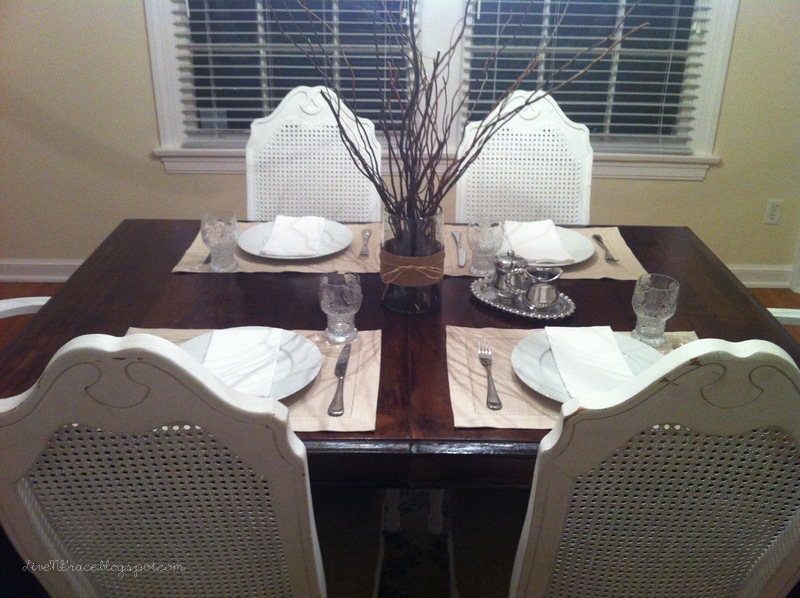
Several weeks ago, Brian and I stumbled upon this beautiful 7 piece dining room set with 2 additional leaves. Our current dining room table, if you can even call it that, was a little farmhouse table that we re-did about 18 months ago. It was really too small for our new dining room and it could hardly hold 4 people. This new piece was actually painted white and the chair seats were covered in burlap (not necessarily what I would have done...but the burlap I can live with).  I wasn't really "looking" for a new set, just yet, but when I spotted this, I couldn't let it go. The table is a beautiful oak table, with cane-backed chairs  (swooning). 


Redoing furniture always sounds like a very easy process...but honestly, it is a work of patience! This piece took me about 2 weeks to complete AND I'm still working on the leafs for the table. 


Before 
I don't usually strip paint off furniture if I am going to repaint it. Stripping paint is a VERY tedious process, so I only recommend it if you are restraining wood to its original. For this piece, I used about 4 cans total of paint stripper. I should have bought the big canister. You can find paint stripper at your local hardware/paint store. You want to use the HEAVIEST/THICKEST stripper you can find. DO NOT USE aerosol stripper! I basically pore the stripper straight onto the table, then use a foam brush to spread the paste all over the paint. This works best if you do small sections at a time. Let the paste sit for about 20-30 minutes, then begin to strip the paint. You will need a paint stripping knife to do this. If the stripper is working correctly, the paint should come off in big strips...if it's not it will come off in smaller pieces. 


This piece took about 1.5 weeks to strip ALL the paint off. It had lots of trip work on the sides that were very time consuming to strip. 
 Once you've gotten all the paint removed from the surface....and it must be ALL the paint. You will want to sand the surface. I usually use a 220 grit sandpaper for most projects. At that level, you can be sure it will not scratch the surface. You just want the surface smooth and slightly gritty in order to hold the stain. 

After, you are comfortable with the sanding, wipe the table down with a damp cloth (mineral spirits or water). 

After the table is dried, you are ready to begin staining. I always use MinWax when I stain furniture. I trust the tint of the stain and the durability on the furniture. For this piece, I actually used two different stains (a regular oil-based stain-table top and legs & a gel based stain-trim work). 

Again, I use a foam brush to coat the stain. It is important that you notice how thick you are coating the table. If the stain is too dark you can always wipe it off with a clean cloth. Let the stain dry for about 24-48 hours or until tackiness goes away. DO NOT rush this process. If you rush the drying process, you will it end up with blotchy spots on the table. 

After the first coat is dry, sand the table (again with 220 grit sandpaper). It is important to go with the grain of the table to insure that you don't get scratch marks. Again, wipe the table down with a damp cloth of mineral spirits or water. Let dry. 

Repeat staining process to desired color. 

After the stain is 100% dry (for this project it was about 3 days), you will want to coat the top surface with a Polyurethane. This keeps the surface protected and also allows you to clean the surface later on. I used a clear semi-gloss for this table, but there are several surface options. Let dry for about 48 hours or until dry to touch. 

Finished product
I am very pleased with how this piece turned out. I still need to finish the leaves, but it is the perfect table for this room. 

The key to refinishing furniture is really patience! Try not to have a set deadline and allow it to become a fun, relaxing hobby! 


sorry for the poor quality....I've asked Santa for a nice new camera :)))
Consider "following" Live In Grace, by clicking the follow button on the right hand side OR leave me a comment...I'd love to hear what you think!!!

                                                                                                 ~G